Tuesday, February 21, 2012

Tips Seven, Eight, Nine, and Ten

Today in Photo J we focused on the last four tips of Kodak's Top Ten Tips. These four tips are move it from the middle, know your flashes range, watch the light, and be a picture director. 

This photo is an example of move it from the middle. When using this technique, imagine a tic tac toe board over your picture. place your object where a horizontal and vertical line intersect. When deciding which side to place your photo on, pay attention to leading lines and if the way your subject is moving. If your subject is moving, make them run into the open space, no off the page. 

This photo is an example of knowing your flashes range. As the photographer, know where the object needs to be for the flash to work effectively. Usually the range of the flash is from four to eight feet. 

This photo is an example of the technique watch your light. Know your surroundings and the way the sun is shining. Knowing this will help your subject not have shadows on top of their face or body. 

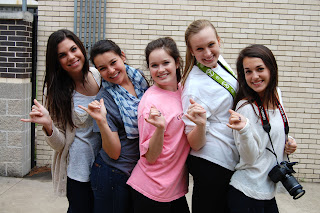
This photo is an example of being a picture director. Instead of taking a photo of a group of people randomly placed, arrange your subjects making them pose. Thinking about grouping and the final product will be beneficial when using this tip. 


Hope you enjoyed these tips!- food, friends, and fashion. 

Monday, February 13, 2012

Tips Four, Five, and Six

This week in Photo J, we continued to look at Kodak's Top Ten Tips. The Three Tips we learned this week were to take vertical pictures, blur the background, and zoom in close. Here of some examples of these techniques. 

This picture is an example of a vertical picture. When your out and about taking photos, turn your camera vertically ever fifth or sixth picture. I know this feels uncomfortable for some, but objects that are standing vertically usually look better photographed vertically. 

This picture is an example of blurring the background. To blur the background in a picture, focus on the background while holding down the focus button halfway. Then actually move the camera to face the subject you want the camera to focus on. When you move the camera back, the focus of your picture should be the subject you focused on second. You should be able to tell what objects are in the background, but they should be blurred. 

This picture is an example of zooming in close. Zooming in close, also known as filling the frame, give a more personal shot with great detail. When taking a zoomed picture, get as close to the object as you possibly can before zooming with the camera. 
Hope y'all enjoyed these helpful hints. Go be artsy- food, friends, and fashion. 

Tuesday, February 7, 2012

Tips One, Two, and Three


In photo j we looked at Kodak's Top Ten Tips to take successful pictures. The first the tips we learned were getting down at eye level, using a plain background, and using flash outdoors. 
This is an example of getting down at eye level with your subject. Getting down at eye level means to take the photo level with the eyes of your subject. This technique makes the photo more sharp, intimate, and creates a better background. 
This is an example of using a plain background. By using a plain background, make sure the colors of the background and subject do not clash. Also make sure to not shoot into the sun. 
This photo is an example of using a flash outdoors. By using a flash outdoors eliminates the shadow on the face by brightening the face. Using a flash outside especially helps when your subject is wearing a hat. 
Use the helpful hints to improve the pictures you're taking! Enjoy- food, friends, and fashion.